Wednesday 31 August 2016

Signing Off

so, this is it, the last post for me. Today I have made a card for The Male Room and it will be my last card as a DT member. I have had great fun over the 4 or so years I have been doing this for various challenge blogs and have  posted over 560 cards but it's time to say goodbye. Most of the blogs I have worked on are still going strong and I'm sure you will continue to support them. The Male Room is close to my heart as I was there at its inception and remember having the idea of a male themed challenge blog floated at a friends craft club and saying I'd like to do that if only to improve my masculine cards, which I had always found tricky. But, I need to move on and there are great people on the DT, all awesome at creating masculine projects so it's not a hard choice. I had hoped to stay to see the year out but other pressures have got in the way. So, it's not just goodby to TMR but to blogland, at least for the foreseeable future.
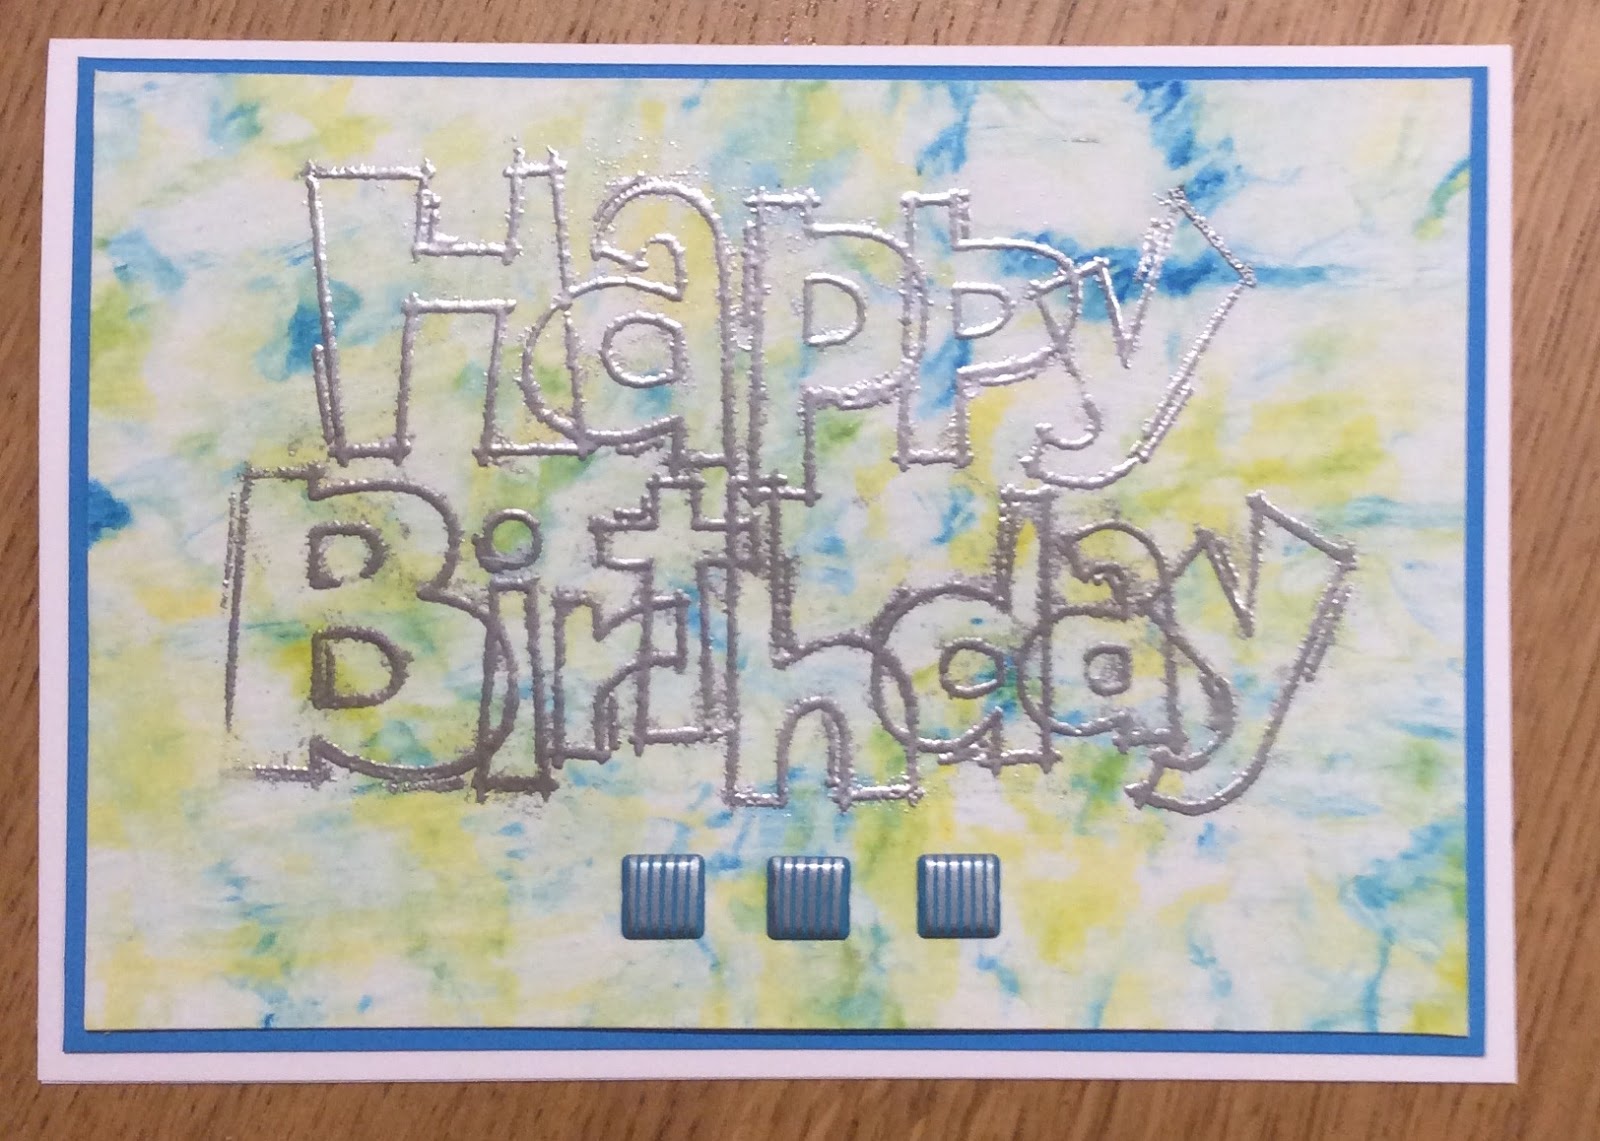
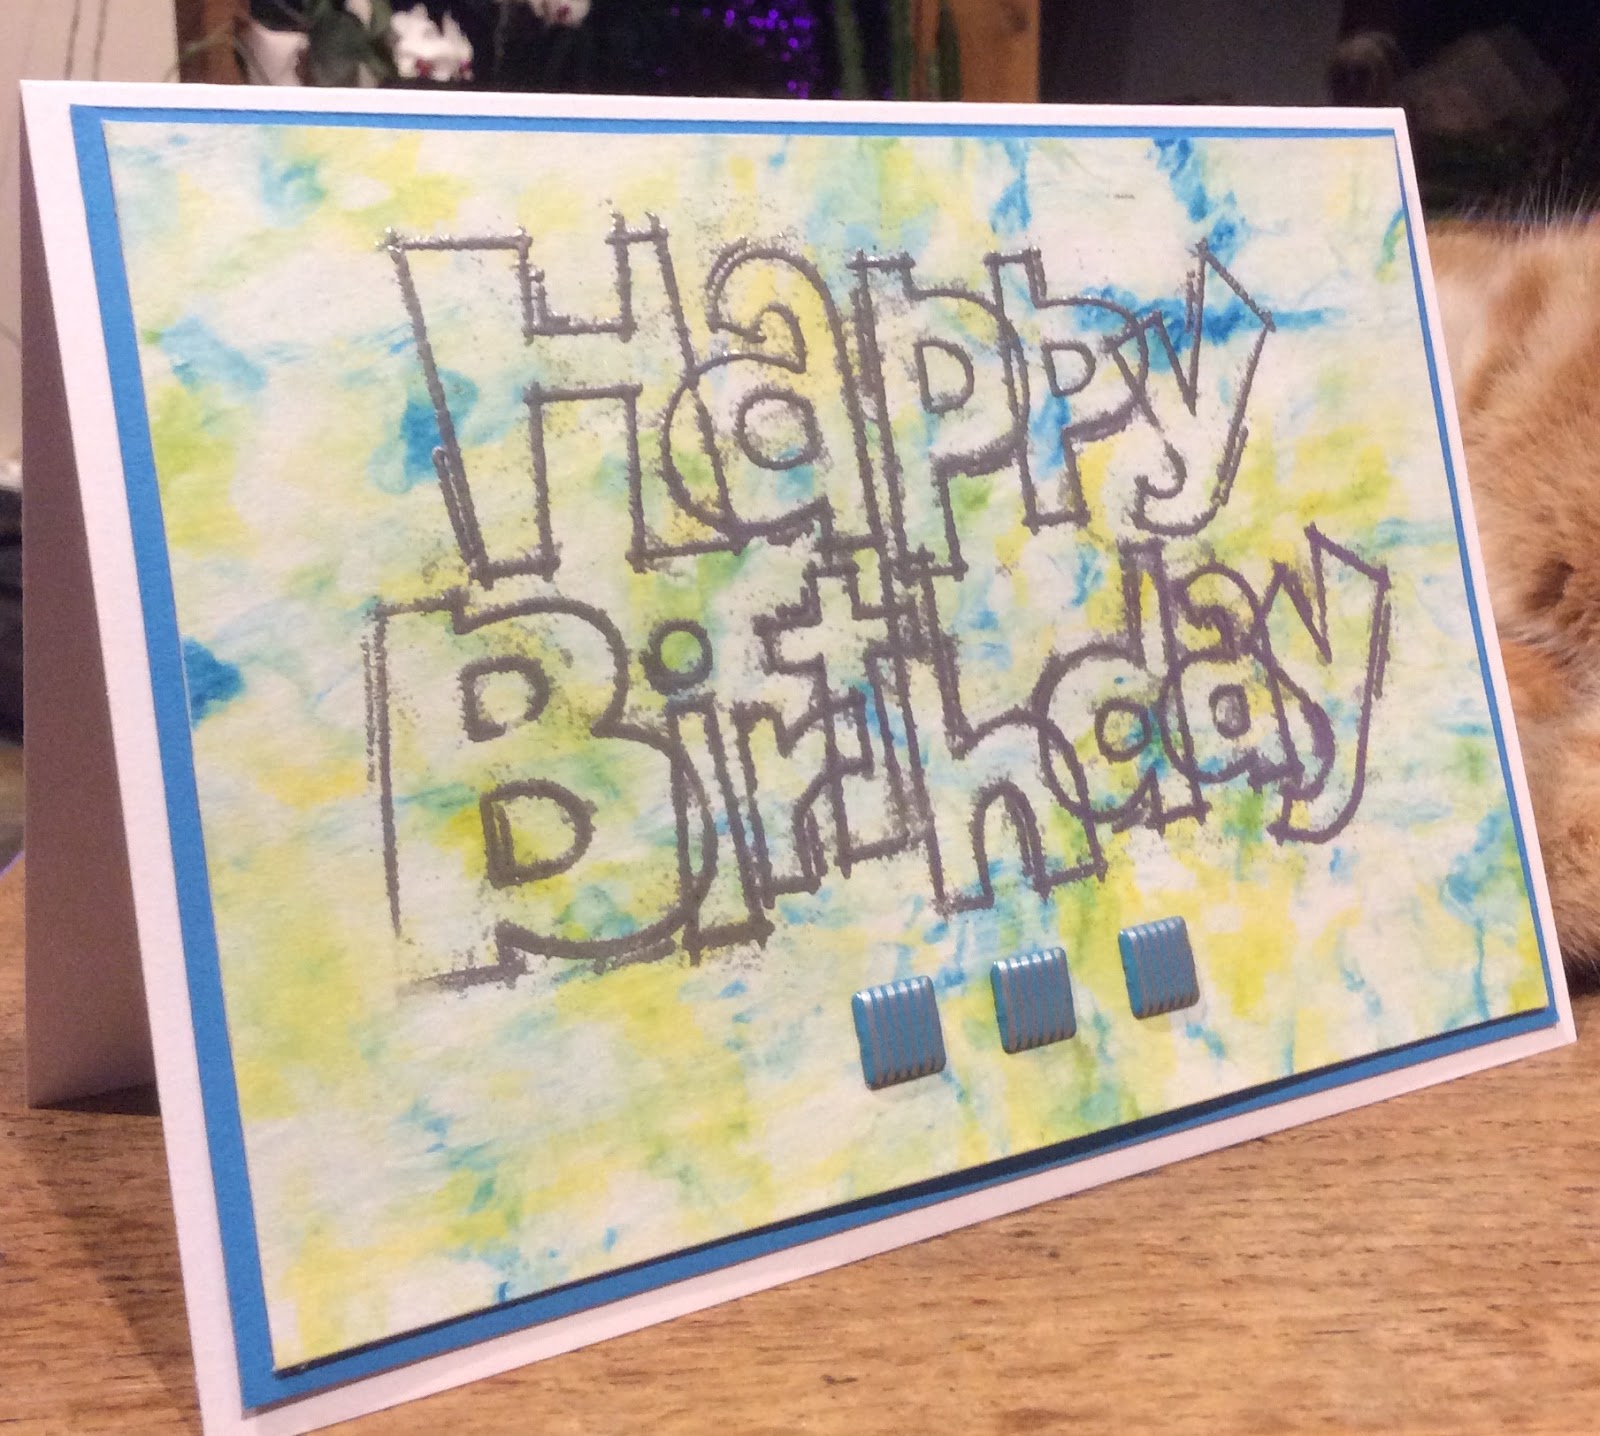
I have made a one layer card for this challenge


It's a card for a teenager, or a rock star! The stamp is from Visible Image, and I know a couple of the other DT members have also used this stamp. I chose to push my limits with stamping (I've always been a bit of a 'smudger' which offends my inner CAS style) and I'm very pleased with how this came out


I chose to use lots of bright colours. In my family the guys love colours and I think sometimes we use too much brown, green blue and black as traditional male colours, so I've slipped in some red and yellow.


Originally the black image was going to be heat embossed but guess what? My heat gun broke this morning! Well timed or not? So, the black is as dark as I could stamp it. The sentiment is from Vertical Greetings. These are all great for contempo cards.


Hope you like this as much as I do. Good luck to everyone who works on any DT, it is a labour of love and may be it is not appreciated how much time it takes up but you are all stars and your passion for crafting always comes through in your cards. Happy Crafting!

Thursday 25 August 2016

Flowers to Finish

Hello and goodbye today. This is my last post as DT member at CAS Colours & Sketches, I have decided to take a rest from card making for the foreseeable future. I have been on the DT since November 2012 and was one of the founder members with my friend Jacqueline. It's been lots of fun and I've seen my CAS style develop and change but I'm finding it less and less enjoyable. A month off proved to me that, far from missing it I was actually relieved at not having to make cards and write posts and comments. So this is my (almost) final post- I am on one other DT and will completely finish next week.
Enough of that, here is the sketch for this week's challenge


You can use any shape without right angles, so I went with a circle and die cut an aperture. I embossed another piece of card and layered it over the top and stamped the sentiment from Happiest Birthday Wishes in the corner. I have also taken the liberty of rotating the sketch, you'll see why!


The flowers are all stamped from Jars of Love and Stippled Blossoms using the two step stamping method. I've used Flirty Flamingo and Sweet Sugarplum, because they were already out on my crafting table and added some Tangelo Twist to the mix.


The surprise is inside, where I have stamped a jar, water coloured some water inside and added a few stamped stems. I also added the stamped band and 'twine'. This keeps the card very CAS on the front, with lots of white space.


Even these lovely new stamps have not changed my mind about giving up card making. I will still be crafting in some way, I always have, and I do still intend to make cards for family and friends, and Christmas, of course. It's been a ball, thanks for checking in to my blog now and then,and Happy Crafting!


Thursday 18 August 2016

Simply Textured

In the summer holiday months the team at CAS Colours & Sketches are taking it in turns to set the challenges and this week I have chosen these three colours

Two of them are new colours from Stampin Up. At first I thought 'cake' but I ended up going floral.


I used a new stamp set too, Touches of Texture, I think it will become a favourite. Here I have teamed it with  Vertical Greetings for the sentiment.


You can just see Sams paws in the photo, he wanted to get in on the crafting today and sat on my table while I was making this card. The sweet Sugarplum colour was used for the sentiment and is the colour of the tiny rhinestones I have used. I used the chocolate chip just for the outline. The card is mostly Flirty Flamingo (what a great name).

Wednesday 17 August 2016

Swirly Whirly Hippyy Card

At The Male Room, a challenge blog for masculine cards and projects, we have a fun technique challenge starting today,


I have done this a few times, but I don't have many reinkers, so when I found out you could use food colouring instead I was up for it. I also make a few sheets while I'm there to store away for another time as you can keep going with the same foam, getting a slightly different pattern each time. I have used mine as a background for a bold sentiment


The squares at the bottom are square, metallic brads. They remind me of cuff links and are great for a bit of bling on a masculine card. I bought them awhile back in Michaels, on one of my holidays and only have two more sets of 3 left 😞


I stamped the sentiment in Versamark before heat embossing in silver. Now, here's a thing; the embossing did not come up all crisp as I always prefer, oh no, it canme up a bit fuzzy. I am not sure why, as I had made the background the day before and it was completely dry. I had tried to brush off some of the excess


You will see what I mean in the close up shot above. But, in this case, I think it goes with the swirly whirly background, like a hippy tie die T shirt, if you know what I mean..
The others on the DT have made some fantastic cards using this fun and easy technique, Ian sure you will too. Tragically, I ripped the stamp when removing it from the block, so this is probably my last card using the image. Shame, as I haven't had it very long and I liked it particularly for masculine cards.

Thursday 11 August 2016

Take it Easy

yep, I'm back from my fantastic holiday in Australia and, to be honest, I'm just gently easing my way back into crafting after over a month away. Thanks to Bev, over at CAS Colours & Sketches for this super sketch which really helped me get going again.


I started by selecting two complementary DPs from my stash (new resolve to stop hoarding and start using!) Then, with the pennant idea in my head I reached for Perfect Pennants to help with the sentiment. Wish I had the matching nesting dies but I don't so thesewere cut by hand.


A few fussy cut flowers, stamped using the two stamp method- they are from my newest stamp set, Jars of Love. I've just sprinkled them around.


I stamped the inside with a plain sentiment from Best Dad Ever and added three more flowers to tie in the design on the front.


Finally, I added a liner to the envelope using the matching DP ( remember my pledge to use it up??).


This is a fairly simple card, minimum stamping, keeping it simple by leaving lots of space, which doesn't necessarily have to be white, hope you like it. Check out my teamies' cards over at the challenge blog.

Wednesday 6 July 2016

Masculine Flowers

This will be my last post for a few weeks as, during the rest of July and the beginning of August I will be on holiday with my family in Australia- yes, all 5 of us on Walkabout! Getting excited now, but I was also excited about the challenge this morning at The male Room.

Wowser! How to do that?
With DP of course! My coordinating papers come from a Rosie's Studio collection called East Meets West and it's perfect for this challenge.
The photo is accurate, the background colour graduating as you move diagonally downwards. There is a name for this, is it ombré? Anyhow, I cut the panel, mounted it onto red CS to accentuate the fine red detail in the flowers.


Next I added a banner, stamped using Thoughtful Banners and punched out with my new banner punch (could be Best Buy ever!) I also added two little red hearts, using the Owl Builder Punch.


Popped the banner up on foam pads. I then carried on decorating the inside of my card with another paper from the East meets West collection. I used the little white mat so that you can write your message


Finally, a third DP was used to decorate the envelope inside.


I am so pleased with how this turned out. The dark colours fit the sentiment well (I did think of going with a sympathy card, but this is better) and the fact that the three papers come from a set mean that they truly coordinate.
Hope you have as much fun with your masculine flower card as I did and see you in a month or so!

Friday 1 July 2016

Over The Rainbow

I have a new card to share, using that awesome double challenge at CAS Colours & Sketches

I have taken a couple of liberties, firstly but turning it upside down, and secondly by moving the sentiment, but I like this card much better than my first attempt, which, to me, was not quite CAS enough,


Turned around the curve looks like a rainbow ( a bit) and so that gave me the 'make a wish' idea, and from that came the star. It was all because Perfect Pennants was out on my crafting table.


I stamped the sentiment in pink first, then overstamped, just off setting a touch, to get the shadow effect on the letters. 


There is just a wink of Stella on the star to make it glisten too 
I've done the inside again, with a greeting and a stampede off image of the star, like a watermark.


The sentiment is from a set called Whacky Wishes.


Thursday 30 June 2016

Big Hello


With there being 5 Thursday's in June this year we always celebrate at CAS Colours & Sketches with 'The Double' where we set the sketch and the colour. So here it is.....l


Isn't that a great sketch, teamed with luscious summer colours. Just remember to keep it CAS, it's easy to get carried away with these colours to play with!

I used a curved mask to protect part of my card whilst I stamped a background using Gorgeous Grunge, Toughtful Banners and Touches of Texture


Then I die cut 2 'hello's from the Hello You set and layered them up to make them stand out more. 
I stamped one more little pink flower, fussy cut it and popped it on a foam pad and a final one inside, next to the greeting, which is from Perfect Pennants


At Craft Club last night we looked at how much more 'professional' our cards can look with an insert, even if it's just a stamped sentiment with something connecting the design on the front of the card. This was by far the simplest thing we tried out and it has made me think more about the inside and the envelope I use for my cards

Thursday 23 June 2016

Two cats On A Fence


Thursday means a new challenge at CAS Colours & Sketches and so we have a sketch to inspire your cards. Love this one, it's really versatile and makes CAS cards a doddle!


You will notice that I have rotated the sketch to allow my two cheeky cats to sit on top of the fence. They are both stamped using You Little Furball, one in black and one in Hello Honey. The fence is, of course, Hardwood, stamped using More Mustard.


To add interest the sentiment is stamped vertically, so easy now with the Vertical Greetings set. The grass is a freebie stamp and I've used the Mossy Meadow green that I used for the grass.


Below you might be able to see the subtle touches: a tiny rhinestone on the collars to represent the bells you sometimes see on cats' collars, a light touch of a Wink Of Stella and the embossed clouds behind them. This was a challenge, as the direction of the embossing folder and the fact that I only wanted the area behind the cats and fence to be embossed with the clouds, meant that it wouldn't go through my Bigshot. 


Solution? I used a rolling pin!

Wednesday 22 June 2016

Buttons!

Buttons! And this time for a masculine card for the new challenge at The Male Room


This was a chance to play with new stuff again, this time the set Jars Of Love. I can see loads of ideas for this set but here is quite a straight forward one with a sentiment which I think a man would appreciate

After stamping the jar and cutting it out I stamped a few button images to add background to my real buttons. I used my new banner punch too, love the crisp edge I now get on my banners when I don't have to hand cut them out. The sentiment fitted just nicely and I sponged the edges to lift the banner a little.


I stamped the handle of the jar across the jar image and then matched it up against the same image stamped directly onto the card front. Finally, I added a hand drawn border.

By the way, this is Buttons in our family, a lovely old gentleman, once the children's pony, now happily retired for the most part, except for the odd occasion when I hitch him up to the cart and he takes me for a spin along the country lanes


Thursday 16 June 2016

Old & New

Sorry, CAS Colours & Sketches followers, I was missing in action last week due to a couple of family issues but I'm back this week with Bev's awesome colour challenge, I just LOVE these colours together, so summery and they remind me of sherbet sweeties or candies, although I make it a rule never to eat green sweets!


I've called my post Old & New, since these colours have been around for a bit but my stamps are brand new! Love getting new stuff, don't you? I've been very conservative over the last year and haven't ordered much stuff but when I saw this set in SU's new catalogue I just had to have it- I've looked everywhere for vertical sentiments and this set, Vrtical Greetings has them all!


I inked up the plant stamp with the three colours. It was a bit tricky and my Stamp-A-Ma-Jig helped me get them straight. I have used a pool party mat and I also stamped a couple of extra pots and fussy cut them out to pop up on foam pads


I added a Wink Of Stella to add a bit of glisten to the pots, it's my new favourite bit of kit, I will probably have to give myself a strong talking to to avoid over using it!
A very simple and clean card for a summer birthday.

Wednesday 8 June 2016

Flying High

Whilst I was busy stamping watercolour effect backgrounds I made a second card, this time for the challenge which goes live today at The Male Room. It's a special day too as we are welcoming four new designers to the team! Today's challenge is a theme and, somewhat predictably (although we are a challenge blog for cards for guys, so we have a very valid excuse) we have chosen


And here is my card


I used two inks, Tempting Turquoise and Crushed Curry to make my skyscape for the little plane to fly out of. I don't own the stamp, I just borrowed it from the craft club leader. It is stamped in Always Artichoke.


I made a banner and stamped the greeting also from a stamp set which I borrowed (it's fun to play with other people's stash and share yours too!). After fussy cutting out the banner I popped it up on 
foam. I had the idea of it trailing behind the plane but just couldn't get it to work here.


I love the way the ink has pooled and dripped and spread over the shimmer cardstock.
There is a fun watercolour challenge at another CAS challenge blog AAA cards which I will pop this card into.